Introducing ARIA Connector EA — your new ally for trading with AI and full chart-based control
Do you want to take your trading to the next level and become a faster, more accurate trader with no doubts?
With ARIA Connector EA, you’ll have not only a complete order execution system, but also deep technical analysis powered by artificial intelligence (OpenAI), directly on your MetaTrader 5 chart!
Why is ARIA Connector EA the best choice for you?
Real-time market analysis with AI
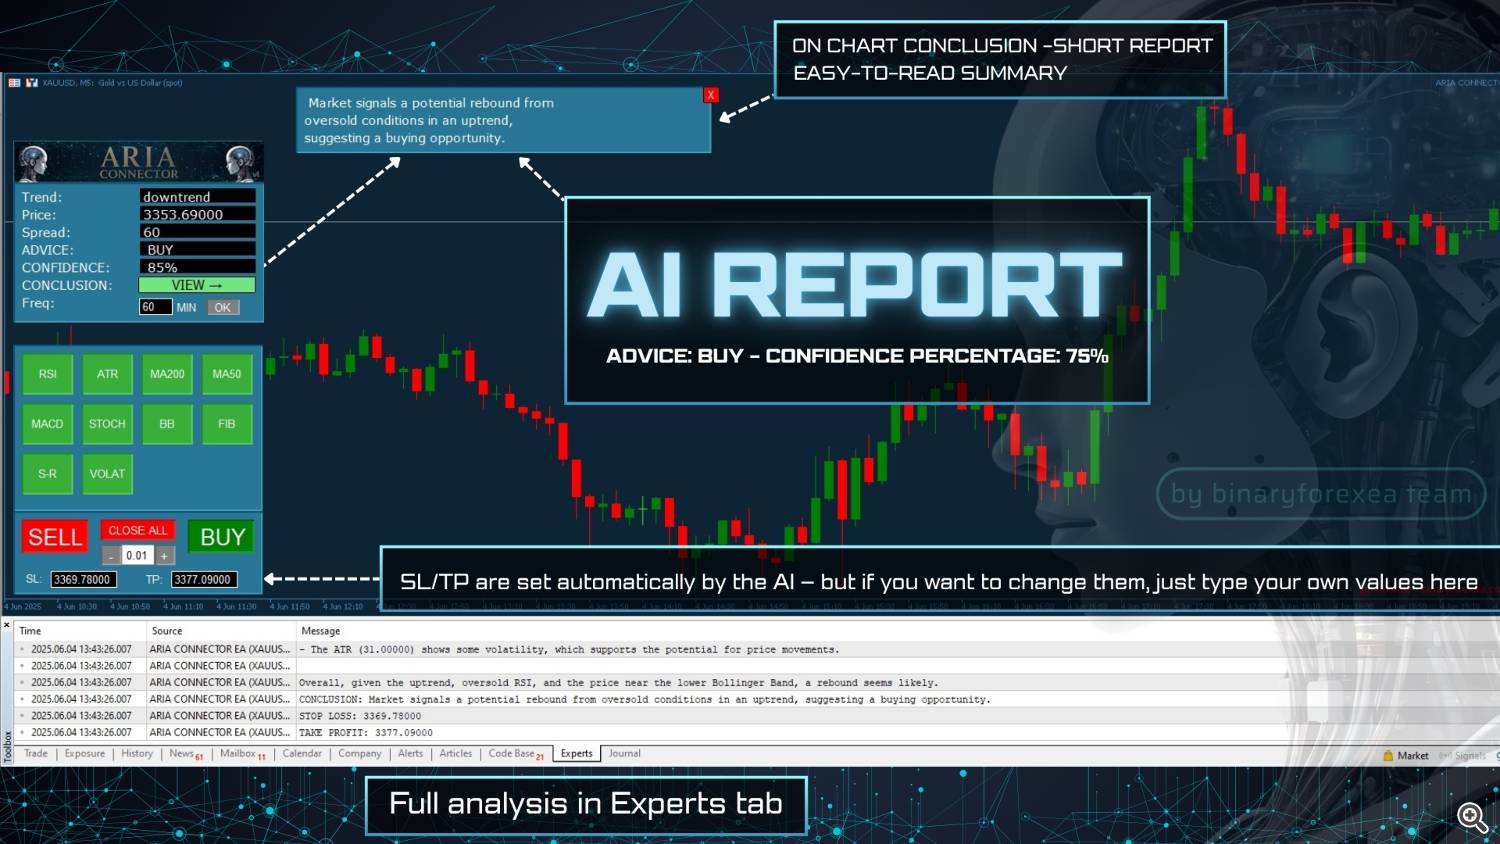
ARIA Connector EA connects directly to OpenAI (models GPT-4 Turbo, GPT-4o Mini, GPT-4o, and GPT-4o1 Mini) and, with every call, gathers trend data, indicators, and key levels to produce a clear technical report with:
- ADVICE (BUY/SELL/WAIT)
- CONFIDENCE (%)
- FUNDAMENTAL (brief explanation)
- Recommended STOP LOSS and TAKE PROFIT
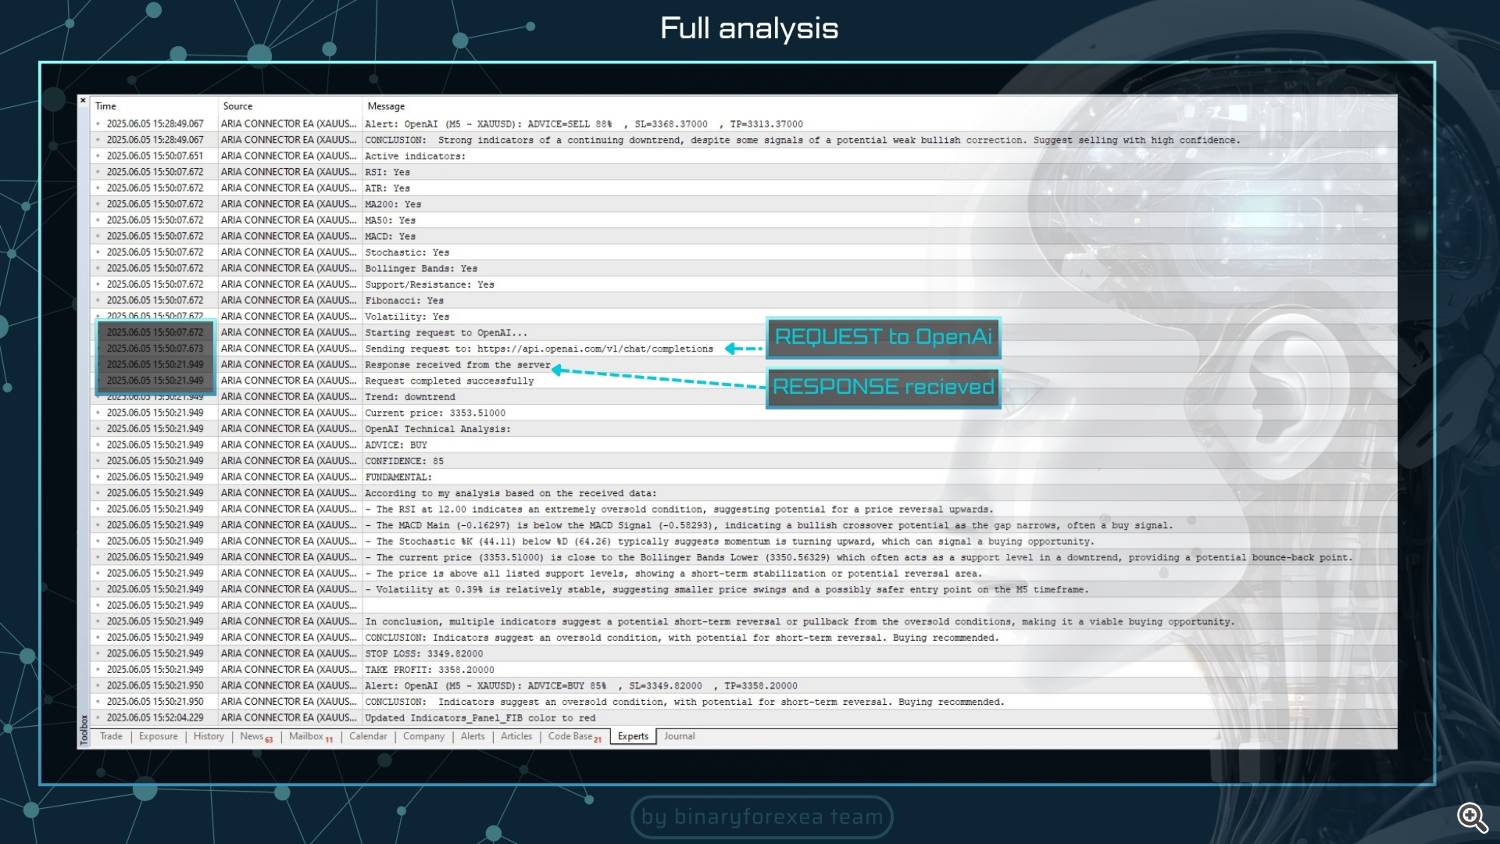
Forget manually interpreting dozens of indicators: AI summarizes everything in seconds.
Fully interactive Trading Panel
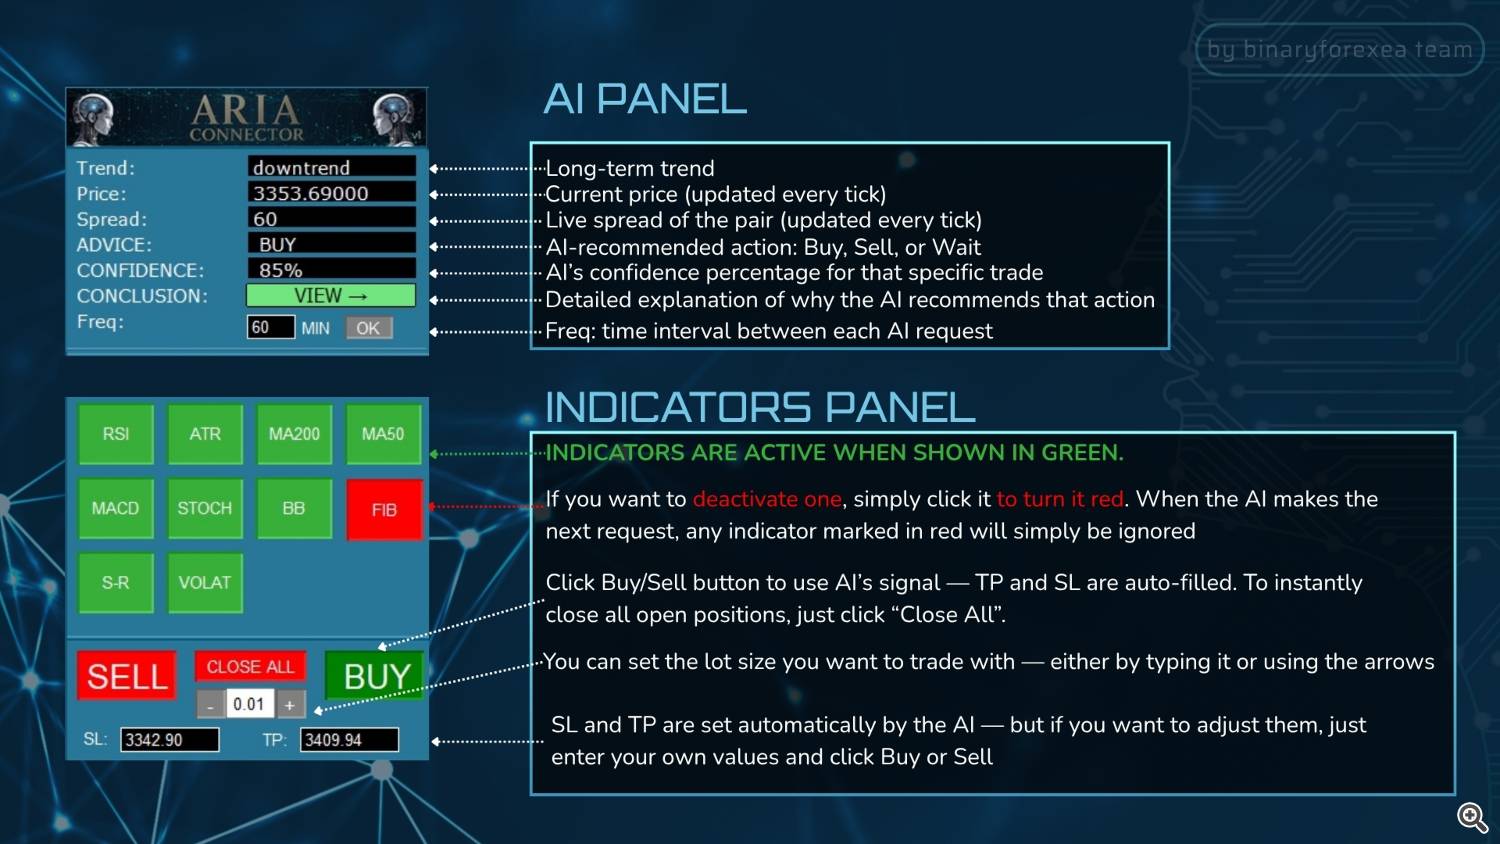
A panel on your chart allows you to:
• Choose lot size with “–” and “+” buttons or enter it manually.
• Set your own SL/TP or use the AI-suggested values.
• Execute BUY or SELL orders with one click.
• Close all open positions quickly and easily.
No need to open the “New Order” window: everything happens visually and intuitively.
Dynamic indicator selection: full control over your analysis set
A section with 10 buttons to activate or deactivate indicators instantly:
- RSI
- ATR
- MA200
- MA50
- MACD
- STOCH
- BOLLINGER BANDS
- FIBONACCI
- SUPPORT-RESISTANCE
- VOLATILITY
You can modify indicator periods anytime by pressing F7 on your keyboard.
Example: If you prefer a lighter analysis using only RSI and ATR, just click the boxes for the other indicators (they will turn red) and leave only “RSI” and “ATR” in green. On the next prompt, only those indicators will be sent to the AI, resulting in a shorter and more precise analysis.
Each box changes color (green = active / red = inactive), so you decide exactly what the AI includes in its analysis.
Trading Panel: Execute orders with a single click
- “SELL” (red) and “BUY” (green) buttons: instantly place trades without opening manual order windows.
- Each command respects the values in “SL_Edit” and “TP_Edit”, or you can use OpenAI’s suggested levels.
- You can adjust lot size using “–” and “+” or enter it manually. Only numbers and decimals are allowed.
- “CLOSE ALL” button: closes all open positions on the current symbol. Ideal for fast exits in urgent situations.
AI Analysis Box: Real-time, clear trading recommendations
- Trend: Shows if the market is trending up, down, or sideways (based on EMAs 50/200 and current price).
- Price: Displays current BID price.
- Spread: Shows current spread in points.
- ADVICE: AI suggestion: BUY, SELL, or WAIT.
- CONFIDENCE: 0–100% confidence in the suggestion.
- FUNDAMENTAL: Brief explanation based on active indicators.
- Freq: Frequency (in minutes) of each AI query (editable).
Click “Click to view” to open the Fundamental Window with full explanation.
Fundamental Window: Understand the “why” behind each recommendation
Click “VIEW”. A box appears in the bottom-left of the chart with the main reason for the AI’s analysis. To close the window, click the “X” at the top-right of that box.
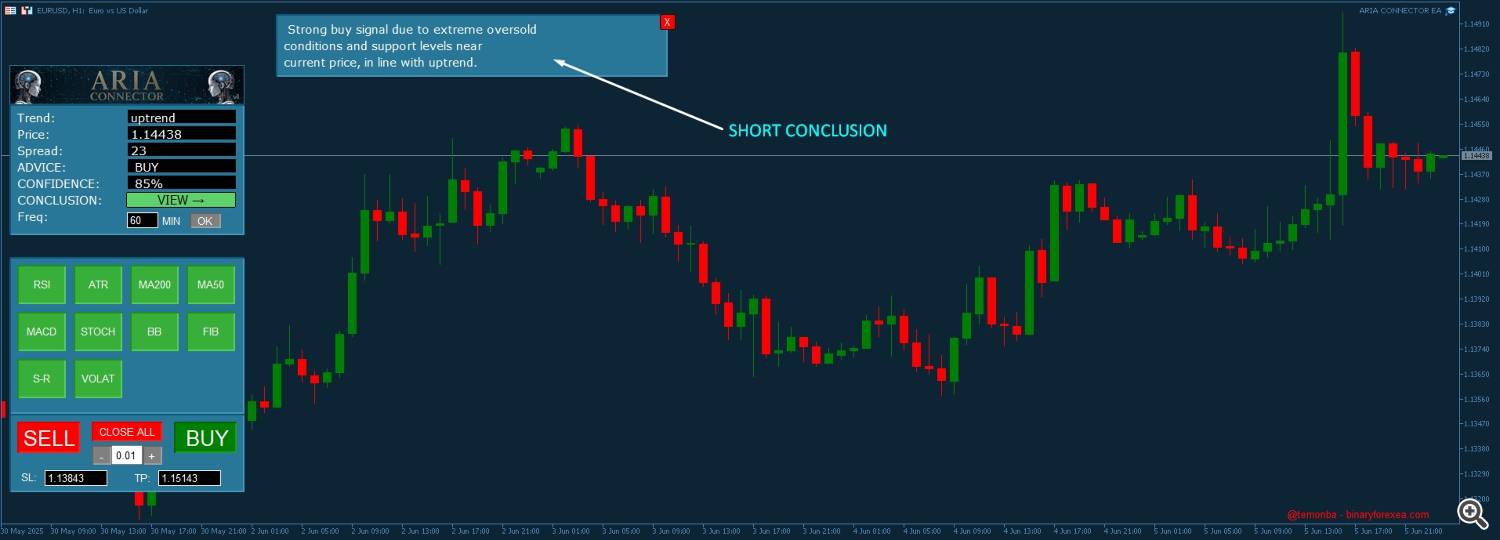
Full chart style customization
You can change background, candles, bars, and volume colors without leaving the EA.
Say goodbye to cluttered templates: pick your favorite color scheme (e.g., dark background with green/red candles) for a more comfortable trading experience.

How to Set and Enable Alerts in the EA
Besides using the API Key for automatic analysis, this EA includes a system of built-in alerts to notify you when certain conditions are met.
Examples:
• When price reaches a specific level.
• When the AI recommendation changes to “BUY” or “SELL”.
These alerts help you stay informed even when you’re away from your screen.
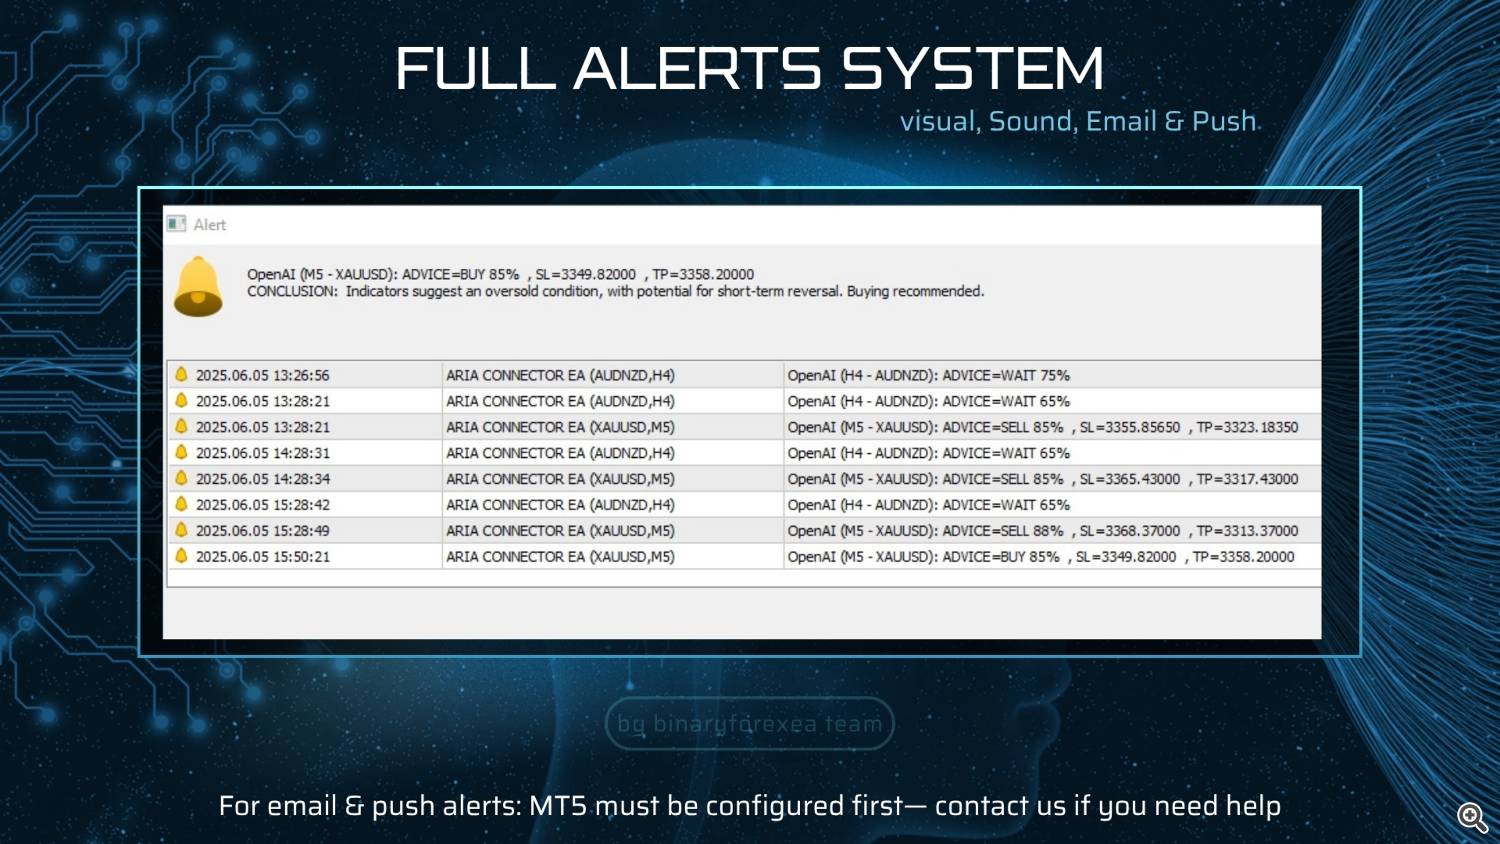
AI Call Control and Cost Saving
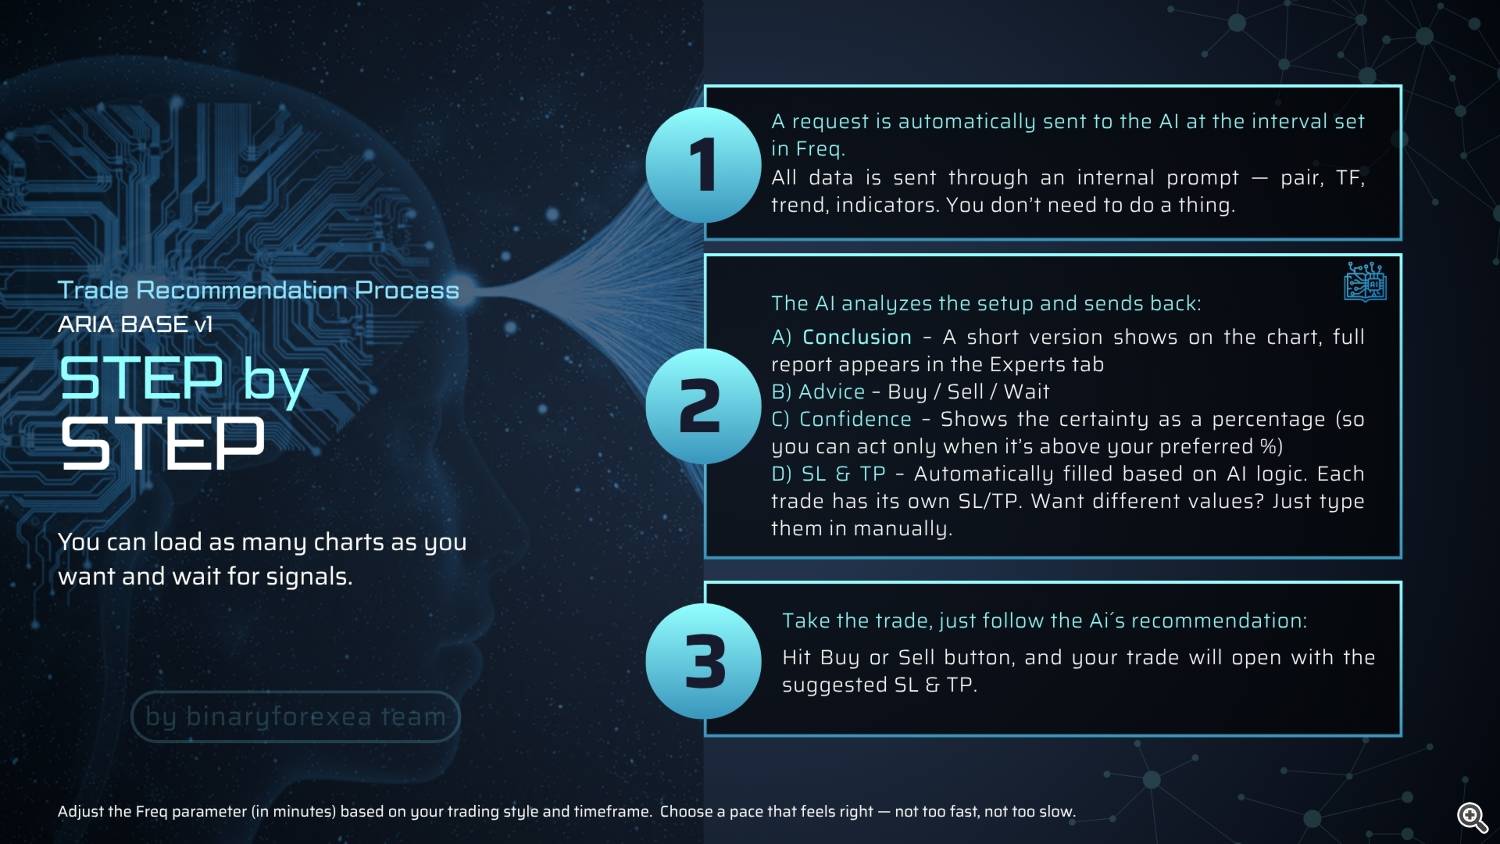
ARIA Connector EA sends queries to OpenAI based on the frequency you define.
You can set how many minutes should pass between each AI analysis (default: 60 minutes).
• For long-term trading: set 120, 240 minutes.
• For intraday trading: set 1, 5, 15, or 90 minutes.
This way, you avoid unnecessary API calls (even though they’re very affordable), optimize OpenAI usage, and manage your token budget better.

Want to change the frequency?
Double-click the “Freq” field, type a number (e.g., 30), and click OK. The number always represents minutes.
You’ll see this in the MT5 log: Query frequency updated to 30 minutes
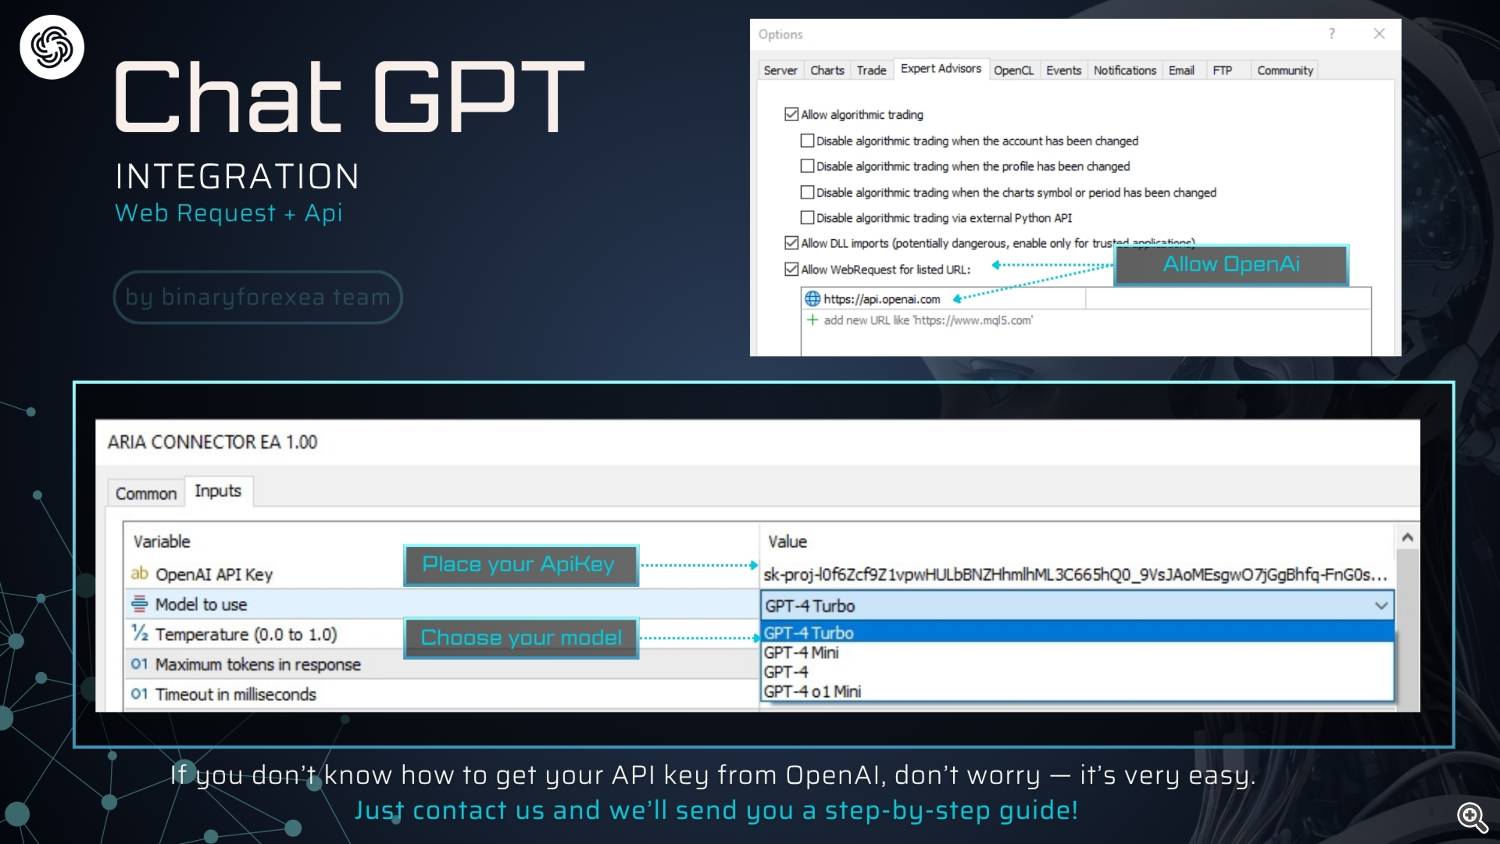
WebRequest Setup: you must configure this BEFORE placing the EA on the chart to allow connection with OpenAI.
TOOLS ⇒ OPTIONS ⇒ EXPERT ADVISORS
API Key Configuration
- In the “Inputs” tab: enter your OpenAI API Key, select the model (MODEL_GPT4_TURBO recommended), and adjust indicator periods if desired.
If you don’t know how to get your key, scroll down for a step-by-step guide. - Click OK and done: the panels will appear and, if a key is valid, the first OpenAI call is made showing immediate analysis.
Key Features & Real Benefits
Time-saving and Simplicity
- Fewer clicks, more results: With just a couple of clicks, you get an AI-powered analysis that would normally take you 15 minutes to compile manually.
- All-in-one visual interface: No need to switch between windows or dig through the “Indicators” tank — everything is right where you need it.
Informed and Objective Decisions
- The ADVICE signal isn’t a “gut feeling” — it’s the result of dozens of technical values processed by OpenAI.
- The CONFIDENCE percentage lets you filter out low-certainty recommendations.
- The FUNDAMENTAL explanation shows you why the AI suggests a particular action, giving you the confidence to follow it — or wait for further confirmation.
Adaptable to Any Strategy
- Scalping, intraday, swing, or position trading — you can select only the indicators used in your method.
- If your strategy only relies on RSI and Bollinger Bands, simply activate “RSI” and “BB” (green), and set the rest to red.
How to Create and Verify Your OpenAI Account and Get your ApiKey
1. OpenAI Registration
-
Go to https://platform.openai.com
-
Sign up or log in.
-
If you don’t have an account, click “Sign up”.
-
Enter your email address and choose a secure password.
-
You’ll receive a confirmation email — click the link to verify your address.
-
If you already have an account, simply click “Log in” and enter your credentials.
2. Set Up Your Profile and Organization
-
Access the User Dashboard:
After verifying your email, log in and you’ll land on the OpenAI Dashboard. -
Click your avatar or initials in the top-right corner to open the menu.
-
Complete basic profile info (optional but recommended):
In the “Profile” section, enter your full name and contact info — this helps with account recovery or billing support. -
Create or select an Organization:
OpenAI uses an “Organization” structure. If it’s your first time, one is created for you automatically.
You can manage multiple teams or projects within the same Organization — useful if you’re working on more than one EA.
3. Set Up Billing and Payment Method
-
Go to the “Billing” section via the main panel or menu.
-
Click “Payment Methods” and add your credit/debit card or PayPal account.
-
You can also check initial credits if any are available under your plan.
4. Create and Manage Your API Key
-
From the top menu, go to “API Keys”.
-
You’ll see a list of any existing keys (if any).
-
Click “+ Create new secret key” to generate a new one.
-
Give it a clear name like “Project-MyEA-Apr2025”.
-
Once created, a unique alphanumeric key will appear.
Important: This key will only be shown once. Copy and save it in a secure place immediately — such as a password manager (e.g. LastPass, 1Password) or an encrypted file.
If you lose it, you’ll have to revoke it and create a new one.
You’ll see details like creation date, last activity, and revoke option in your API Keys list.
5. Model Access and Permissions
As of 2024, OpenAI no longer requires manual enabling of models. Instead:
Availability depends on your subscription plan. If your account doesn’t include GPT-4, requesting “gpt-4-turbo” will return an error.
Check Rate Limits and Quotas
In the “Usage” or “Quota” section, you can monitor:
If you’re planning to use frequent calls (e.g. every minute on multiple pairs), make sure you stay within your quota to avoid service disruptions.
If you have any doubts or get stuck at any step, message us privately and we’ll guide you through!
binaryforexea team

